
 So we are almost through the list of sweet treat crazes of
2013, but I have been saving this particular sweet treat craze for a special
little nephew of mine for his birthday. I am of course referring to the
Peekaboo cake craze that is sweeping social media this year. Whether you've
seen it done on the Great Australian Bake Off with their checker board cake
challenge or seen the images a plenty on line of cakes sporting polka dots,
rainbow swirls and even love hearts, we've all questioned "well how one
earth do they do that?". So we thought we would show you! But given the
abundance of tutorials on line on how to bake polka dots into your cakes we
decided to take it to the next level and try something you hadn't seen before
(we have actually only seen this done once before albeit unsuccessfully), a
name cake. Yes that's right, cut the cake open to reveal the name of your loved
one or maybe some special words. Now this will really only work for short
names/words, unless you find some very small letter cutters, but you may lose
the effect. And of course this can be done with any sort of image cutters, it
doesn't have to be letters, so let your imagination run wild.
So we are almost through the list of sweet treat crazes of
2013, but I have been saving this particular sweet treat craze for a special
little nephew of mine for his birthday. I am of course referring to the
Peekaboo cake craze that is sweeping social media this year. Whether you've
seen it done on the Great Australian Bake Off with their checker board cake
challenge or seen the images a plenty on line of cakes sporting polka dots,
rainbow swirls and even love hearts, we've all questioned "well how one
earth do they do that?". So we thought we would show you! But given the
abundance of tutorials on line on how to bake polka dots into your cakes we
decided to take it to the next level and try something you hadn't seen before
(we have actually only seen this done once before albeit unsuccessfully), a
name cake. Yes that's right, cut the cake open to reveal the name of your loved
one or maybe some special words. Now this will really only work for short
names/words, unless you find some very small letter cutters, but you may lose
the effect. And of course this can be done with any sort of image cutters, it
doesn't have to be letters, so let your imagination run wild.
Step 1.
Bake your cakes for the letters inside the cake (get the
recipe for our butter cake here). We baked 3 square butter cakes coloured with
red food gel (one cake per letter to spell 'MAX').
Step 2.
Once your cakes are completely cooled, trim the tops of your
cakes with a serrated knife to ensure a flat surface to work with.
Step 3.
Using letter cutters, cut your letters out and set aside. We
got four of each letter out of each cake.

Step 4.
Prepare your cake batter for the rest of the cake. You can
use the same butter cake recipe here.
Step 5.
Place a small amount of batter in the base of your tin and
smooth over. Align your first row of letters set at least 2cm back from the
front of the cake tin.Stack the remaining letters behind without any gaps.
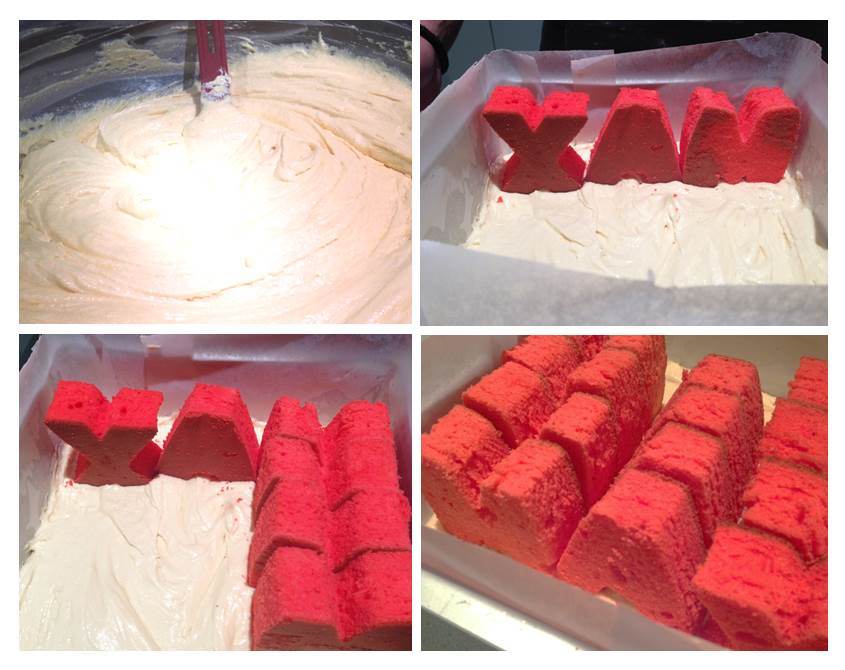
Step 6.
Using a piping bag, pipe your cake batter in an around your
letters, filling the tin. Use a spatula to smooth over the top of the cake.
Step 7.
Bake cake as per the recipe and allow to cool.
Step 8.
Once completely cooled, trim the cake sides and top using a
serrated knife to ensure a perfectly sized cake with the lettering centered.

Step 9.
Decorate as desired. We covered our cake in butter cream
with fondant cut letters to match the inside of the cake. Get our butter cream
recipe here.


