Tuesday 3 December 2013

Dreaming of an Ombre Christmas

First week into December and now I have really switched into Christmas mode! We actually spent last weekend Christmas shopping, never have I been so organised! And although I may be organised in a present sense I am not yet organised from a decoration sense. Although I must say, I have got it sorted out all in the thoughts of my crazy mind.......well that's a start right?! I would be lost without Pinterest, if I had no platform to scrap book all the designs I want to incorporate for my Christmas, I would literally be in one big colourful Christmas mess! And I must say, those big colourful Christmas messes do exist. Last week I had the privilege (or should I say disadvantage) to be invited into my bosses home, only to have my retinas burnt by what I could only describe as Santa's vomit all over the walls! Never have I seen a house so overly decorated with no one colour scheme being utilised, but instead a frantic display of every Christmas decoration they could find in any department store to create their Santa wonderland.......and a wonderland it really wasn't!

So my inclination for our Christmas decorations this year is to embrace brighter pastel colours, floral centre pieces, rag garlands and incorporate the one and only 'ombre'. A popular craze this  year that I have blogged and referenced frequently. 

So I've done some pinning, organized my ideas and feel all prepped and ready to start creating this weekend. This year will be about creating, as i sure as hell haven't seen this stuff in the stores! Wish me luck! 


 Image credits and the full Pinterest board can be found here.

Tuesday 12 November 2013

Heating up for Christmas

Christmas is exactly 6 weeks away, can you believe it?! Where has this year gone? It only feels like yesterday that I was planning my Christmas table for last year! But rather than drag out the same old Christmas decorations and start to prep for the same old Christmas pud and fruit cake why not heat things up this year and  incorporate some of the hottest food and party trends of 2013 into your Christmas celebrations? 

So over the next few weeks the blog will be hi-jacked by all things hot for Christmas. But first lets capture the basics and see how to incorporate the years hottest trends into the year's biggest and most festive celebration of all.

Fruit cake's a bit ho-hum......but lets try some Do-nut-yum!

Don't forget the hottest food trends that have made quite the impression this year......donuts, popcorn, whoopie pies and marshmallows! Make them 'Christmassy' and consider flavouring them with eggnog, gingerbread, brandy or spiced fruit. And what about the popcorn? Well the flavours you could create are endless! Forget the candy cane popcorn everyone makes and maybe try something a little different like white chocolate and eggnog flavoured, gingerbread and chocolate, or even cinnamon sugared popcorn! My mouth is watering just thinking of all these ideas!

Chill out this Christmas.......


Winter ice cream flavours were very popular this year and even though we don't experience a white Christmas in Australia doesn't mean we still can't enjoy wintery ice creams with all the great spicy flavours of Christmas. How about Christmas Pud ice cream, or Mince Pie ice cream? Or better still, ditch the pudding all together on our summery Christmas day and enjoy a Christmas Pudding Semi Freddo!

Ditch the Red & Green!

 All things ombre have featured a lot this year, whether it be in cakes, clothing or hairstyles. 

I just love these ombre glass ball balls and Santa stockings I came across on Pinterest.  And I love the pink and blue colours too. You would know from years before that I've never been one for the traditional red and green Christmas. This year consider using a different colour palette than the traditional, but just make sure you don't get too bright! Subtle hints of colour are the way to go. Neutral colours were very popular this year in decorating and should be used as a basis for your Christmas palette too. 

Garlands have also been a hit this year, whether made from tissue paper, ribbon, paper or material strips, they are an easy addition as Christmas decorations or even to decorate your tree with. Forget the tinsel and try some garlands!


Get flavouring! 

Just because it's Christmas doesn't mean you have to stick to the traditional fare. Incorporate the hottest flavours of 2013 into your Christmas and consider using Salted Caramel Brandy Butter or making a Salted Caramel Christmas Pud, opt for Caramel Pies over the traditional mince or whip up a batch of Honey Gingerbread cakes rather than gingerbread cookies. Don't forget peanut butter and wild pairings in your Christmas baking too!


As always full image credits and the entire Pinterest inspiration board can be found here. And if you would like to re-read my past blog posts on the hottest food and party trends for this year see the links below.


Saturday 26 October 2013

Boycotting the Halloween Kitsch!

 With Halloween next week, my thoughts have shifted to spooky and scary decorating and baking ideas. Even though we don't celebrate it largely in Australia, I'll take any excuse to get a bit festive and get into the spirit of things. But I must tell you, I am so OVER the crappy kitsch Halloween decorations that you find in the shops and all the gruesome baked treats that are made to mimic bloody fingers, eyeballs, brains and ghosts. Do we seriously need to decorate our houses with fake cobwebs, plastic skeletons and witches hats and make monster face cake pops? I think not. I'm so over it! So this year my Halloween inspiration ideas are simple yet classic, using this years trends with some bold colour ideas, with no plastic skeletons or cotton wool cob webs in sight!

CHEVRON & STRIPES
I just love love love these festive Halloween wreaths and painted pumpkins I came across on Pinterest. Chevron and stripes have been very big this year, and how easy is it to mask up a few different size pumpkins with masking tape and spray them with some spray paint? Or make your own wreath with a cardboard circle wrapped in some simple stripy or chevron fabric. Keep your colour schemes simple though black, white and maybe a hint of orange and green. Which leads me to my next idea!
 

THE BLACK AND THE WHITE OF IT ALL
I think you would agree that sometimes Halloween can look a little OTT with all that orange, green purple and red, all on top of the traditional black and white colour scheme. But why not get back to basics and keep it classic and simple with stark black and white decorations. Spray different types of pumpkins in bold black and white imagery and patterns, decorate your house with different sized black and white candles, and get creative with black and white foods and baked treats. Use hints of orange and green for little bursts of colour. 

 
SWEET AS PUMPKIN
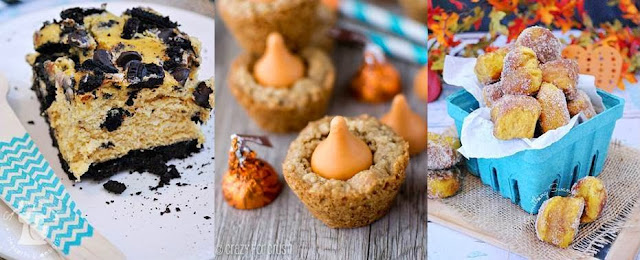
Right you won't find any cakes or cupcakes that look like ghosts or ghoulies here. This Halloween embrace the actual pumpkin in your baking, rather than making your baking look like pumpkins! Ditch the Halloween kitsch and get creative with pumpkin! Try these pumpkin Oreo cheesecake bars, pumpkin spiced oatmeal cookie cups or pumpkin spiced pretzel bites as featured below. Or simply whip up a traditional pumpkin pie or a loaf of pumpkin bread served with lashings of butter. Yum!

MILK AND COOKIES
We can't forget the kids at Halloween, especially given it's mostly about them anyway! And what better way to celebrate after a night out trick or treating than some milk and cookies. Again, we don't need the kitschy baked treats that can often look scarier than they're meant to, instead keep your cookies rustic, simple and of course cute. Matched with some classic bottles of milk themed with black and white stripy straws, it will be the perfect end to a spooky night. And for those young and heart adults maybe try adding a bit of baileys to that milk! 


For my full Pinterest board inspiration and image credits click here. 
Happy Halloween!


Sunday 13 October 2013

Some spooky Halloween cupcakes!


With Halloween only a couple of weeks away now, we thought we would share with you a really cute spider web cupcake decorating idea for all those spooky little sweet tooth's out there!
You'll need:
Cupcakes
Vanilla frosting (bought or homemade)
Palette knife
Food colouring gels (black, violet, orange)
Toothpicks
3 x piping bags
1) Make your cupcakes and set aside to cool
2) If making frosting, combine 2 cups of icing sugar with 2 tbls butter, 2 tbls milk, 1/2 tsp vanilla essence and beat until smooth and fluffy with an electric mixer
3) Split frosting into 4 bowls and colour 3 of them with your black, orange and purple food gels (just use one or two drops until you reach your desired colour)
4) Fill 3 piping bags with each of the coloured frostings, leaving the white aside
5) Watch the video here to see how to decorate

Happy Halloween!


Sunday 22 September 2013

Not just another Grand Final party..........

If you are hosting a Grand Final party this Saturday, I urge you, please please please think outside the square when it comes to your footy party food! Don't expose your guests to yet another frozen party pie or sausage roll! Give them a Grand Final party to remember and incorporate a little bit of gourmet into the mix. But better still incorporate this years hottest party trends into your party to give your guests something to really cheer for! Potato chips don't just have to be potato chips, party pies don't have to be just the same old party pies, and beer snacks do not just need to be your boring old beer snacks! Ive put together some simple ideas as some food for thought, some more simple than others, but each with their own individual wow factors!

Get Gourmet!
Yes OK, I admit it, a little food prep will be involved here, but roll your sleeves up and cast aside the frozen pre packaged rubbish and make your own gourmet party pies, sausage rolls, hot dogs and even potato skins. Nothing beats a homemade pie with pastry from scratch. Explore different flavours with Mini Beef and Guinness Pies, Moroccan Lamb pies, or how about Ale and Cider Pork Party Pies?!


Create a Food Station! 
You've heard be babble on about how hot food stations are this year, so why not incorporate one into your Grand Final party? This is where you can dress up the easy frozen or packet food but make it look gourmet. How about a potato chip bar, or better still a hot chip bar with different sauces and herbs and spices to coat them in? Let your guests build their own gourmet hot dogs with their choices of condiments and relishes. All very simple to set up yet can look very impressive with the right serving ware....think tin buckets or brightly coloured pails, paper cones made wrapped in newspaper, or even simple noodle boxes.


"Get your hot donuts!"
Footy wouldn't be footy without hot jam donuts! But don't buy them, give them the homemade touch and make your own! And get creative with your flavours too, they do not just have to be filled with jam, check out our recipe for Turkish delight flavoured donuts here. But donuts don't just have to be donuts either.....they could be hot dogs too! Combine two footy favourites into one tasty snack, like the maple bacon wrapped hot dogs in a donut bun featured below. Heart attack on a plate I know, but it is one of those 'wild pairings' that may just need to be tried!


Mix the sweet with the savoury!
We all get a bit crazy around this time of year, so why not get a bit crazy with your footy snack foods too! I love these ideas I found of choc dipped potato chips and these very out there bar snacks by themoonlightbaker.com, set with pretzel crust, smoked almond blondie base, potato chip top and dark chocolate drizzle! Wow what a mouthful! Or if you are short on time after all your baking, just simply dip some pretzels in chocolate, get our recipe here.

The Pinterest board with full image credits and loads more inspiration can be found here
Happy Grand Final Day!

Thursday 5 September 2013

It's a wrap!

Its taken us just under 3 months, but we've done it! We've now completed every 'sweet treat craze of 2013' giving you all great little recipes or ideas to try at home and ensure you are up there trending with the latest when it comes to desserts and sweet treats. It was back in June when Mr Meko and I read the article that featured in the Herald Sun on the top sweet treats for the year (read it here), and 3 months later, and dare I say it a couple of kilos heavier, we've covered them all off. 

I thought I would summarise for you the list and the links to the different blogs for easy access to your favourite recipes and ideas. We've had some great feedback on them all via Facebook, Instagram, Twitter and Pinterest and have more than proved that these flavours and ideas are all very hot right now.


Marshmallows

Popcorn 

Caramel  

Peanut Butter

Sweets on a Stick

Ombre Cakes

Winter Ice cream Flavours

Peek-a-boo cakes

Honey

Donuts

Wild Pairings

So Mr Meko and I are now going to retreat from the sweets for a couple of weeks and try and get our diets back on track......eeeeeek sugar detox! But we were glad to be the test dummies for you all over the last few months......now get baking! x

Sunday 1 September 2013

A Rocky Road to go Crais-y about!

I decided this year for the annual Fathers Day family get-together to whip up a batch of rocky road, not only to share with the family but also to gift to my lovely Dad (he just loves it!). But rather than the traditional rocky road of peanuts, marshmallows and glace cherries we decided to put a different spin on it. Standing in the fruit and nut section of the supermarket yesterday, Mr Meko and I brainstormed different combinations of fruit and nuts that might work well together. Apricot and coconut? Dried pear and fig? I think even blue cheese and fig got thrown out there as an idea! Eeeek!! But when Mr Meko  suggested craisins, macadamia nuts and coconut, I knew it would be a winning combo......and needless to say it definitely was a hit! So I thought I would share the recipe for you to try. All too easy (as any rocky road recipe is) and just a little bit different. 

Enjoy x


Craisin, Macadamia & Coconut Rocky Road

325g pink & white marshmallows
150g craisins
100g moist coconut flakes
225g macadamia halves (roasted in the oven)
300g dark couverture chocolate
375g milk chocolate melts

1. Grease and line a small baking tray with silicon paper.

2. Melt your milk and dark chocolate in the microwave in 30 second increments, stirring in between until melted.

3. Meanwhile, place you marshmallows, craisins, coconut and macadamia nuts in a bowl. Pour 3/4 of your chocolate over the dry ingredients and mix well to cover.

4. Pour your mix out into your tray and spread out. Pour the remaining chocolate over the top and smooth out using a spatula.

5. Place in the refrigerator until set. 
N.B Cover with glad wrap once set to avoid the chocolate sweating. 

6. Cut into chunks and serve.

Monday 26 August 2013

Choc-a-block for Fathers Day!

I just realised it's Fathers Day this weekend! Eeeek! How the back end of the year has crept up on us all! So if you are like me and have organised zilch-o for your Dad for Sunday I thought it might help you to know what's out there ready to buy and ready to go! I've focused on chocolate gifts here as what man doesn't like chocolate? (regardless of what they tell you!) And as far as I'm concerned the likes of Bunnings vouchers and bottles of wine can be reserved for birthdays and Christmas, but special days like Fathers Day represent love and appreciation which is always best said with chocolate. I've featured my top 8 chocolate gifts for Dad, but there are many more gifts available on these sites that may suit your budget and style better.

Happy Fathers Day!


1. Cacao Fine Chocolates and Patisserie
For locations click here

2. Darrell Lea
Dad's Bag from $25.00
Available at Coles, Woolies, IGA and Australia Post Shops
 
3. Max Brenner
For locations click here
 
4. Haigs Chocolates
For locations click here

5. Ganache Chocolate
For locations click here

6. Koko Black
Fathers Day Gift Boxes from $23.00
$1 of every Father's Day Gift boxes sold will be donated to Beyond Blue
For locations click here

7. Chocolate Box
Dads Selection Bag from $25.00
For locations click here 

8. Edible Blooms
Delivers Australia wide 
www.edibleblooms.com.au


Saturday 24 August 2013

Cray-cray-crazy cupcakes!

So this is the last blog as part of the series of 'sweet treat crazes of 2013' that I have been working through these last couple of months. We've covered all the hot sweet trends this year from ombre cakes to popcorn, donuts to peanut butter and even winter ice cream flavours (just to name a few!). Last cab of the rank is the idea of 'wild pairings', or more commonly known as two flavours that you would never imagine would be palatable. I researched a lot for this blog and settled on the idea of cupcake as my base. But this wouldn't be just any cupcake, I was adamant to create a cupcake flavour that:  
a) had not been done before, by anyone; 
b) would make you go 'really?' whilst screwing your face up; and
c) go 'oh wow that actually is really yum!' after consuming it. And I'm happy to say that after the all important taste test this afternoon (not only on us but also on members of my family too) I think I have ticked all three boxes. So what is the flavour I hear you ask? Well it's based on the idea of the chili and chocolate combination, where you get the heat of the chili cut against the sweetness of the chocolate to reveal a perfectly balanced combination. 

So drum roll please.... Mr Meko and I present to you, after an afternoon in the experimental kitchen, our Chocolate Honey Mustard Cupcakes with Crispy Bacon Bits. Did your face screw up when you read that? I have no doubt it did. But you do need to try this one before passing judgement, like the chili and chocolate combination you will find a perfect little cupcake harmony going on with your taste buds after one bite. Not just a flat line flavour, this cupcake has multi flavour levels that will make you want another and another. So give it a crack and enjoy x

Chocolate Honey Mustard Cupcakes 
with Crispy Bacon Bits

(makes 24-30 minis)

100g butter
2/3 cup caster sugar
1 tsp vanilla essence
2 eggs, lightly beaten
1 cup self raising flour
1/3 cup cocoa powder, sifted
1/2 tsp bi-carb soda
1/2 cup milk

honey mustard butter cream
3.5 tbsp honey
4 tbsp Dijon mustard
125g butter, room temp
1 cup icing sugar

1 lean bacon rasher, chopped into strips
1 tbsp honey (for glazing)

Preheat oven to to 180c. Line two 12 hole mini cupcake tins with paper cases.
Using a mixer cream butter, sugar and vanilla until light and fluffy. Gradually add eggs and mix until just combined.
Combine flour, cocoa and bi-carb soda. Add to creamed mixture along with the milk. Beat until just combined.
Spoon mixture into cases until each is 1/3rd full. Bake for 15-20 minutes. Turn out on to a wire rack to cool.
Meanwhile to make your bacon pieces, heat a tablespoon of honey in the microwave for 20 seconds to warm, then glaze each strip of bacon on one side using a pastry brush. Spray a baking tray lightly with oil spray placing bacon honey side up and bake at 180c for approx 5 mins or until crispy. Remove from oven and set aside to cool. 

Next make your honey mustard by combining 3.5 tablespoons of honey with 4 tablespoons of mustard in a small bowl and microwave on high for 20 seconds. Stir until combined.

To make butter cream, cream butter and icing sugar in an electric mixer until light, white and fluffy. Scrape the sides of the bowl down and add your honey mustard mixture whilst you continue to beat. 

Load butter cream into a piping bag and pipe on to each cupcake using a circular motion. Chop bacon strips into little squares and decorate each cupcake.

Sunday 18 August 2013

Its not a Cronut.....it's not a Zonut......it's a MONUT!


If you haven't realised that donuts are trending like crazy this year then you must be living under a rock! Whether they are featuring as part of a donut bar or being enjoyed over a hot chocolate as a churros, they are without a doubt the number one sweet treat this year. And I've noticed that there is some serious creativity going on with donut flavours and even some wild 'crossings' appearing with likes of 'cronuts' (a cross between a croissant and a donut) and even 'zonuts' thanks to Adriano Zumbo. So we decided to jump on the band wagon and come up with our own original donut flavour. I did a little research this week on what flavours are trending out there as far as donut fillings go and was really impressed with what I found. From pomegranate mousse filled donuts, to egg nogg and even peanut butter and jelly filled, there was some serious donut envy going on from my side of the laptop! So when I posed the question to Mr Meko "what filling should we do for our donuts?" he answered without hesitation, "Turkish delight".  "Sold!" I proclaimed, being an old Turkish delightful from way back! But with all the Zonuts and Cronuts out there we decided to put our own Meko spin on our donuts and call them a 'Monut'! But is was much to my Mother's dismay who insisted they should be called a 'Mekonut', which I didn't think had the same ring to it. I had to chuckle though when I thought of calling it a 'Gonut' (using the G from our last name), but thought better of it after realising it sounded more like a part of the male anatomy than a sweet treat. So here it is, our Turkish Monuts! You won't find this recipe anywhere else, because it is fresh from the Meko experimental kitchen today. Enjoy x

Turkish 'Monuts'
(makes 24)

You'll need:
3/4 cup milk
14g dry yeast
1/4 cup caster sugar plus 2 tblsp
pinch salt
1 1/2 cups plain flour
220g butter, chilled & cubed
3 eggs, lightly beaten
vegetable oil for frying

Icing
2 cups icing sugar
1/4 tsp butter, softened
6 tblsp water
1 tsp rose water essence
80g pistachios, crushed

Filling
250g traditional Turkish delight pieces 
1/4 cup water

1. Heat milk over a low heat until just warm (overheating will kill yeast). Remove from the heat and pour into a jug. Add yeast, 2 tablespoons caster sugar and salt. Whisk until well-combined. Stand for 10 minutes.

2. Sift flour into a large bowl. Add butter and rub in with fingertips until mixture resembles fine breadcrumbs. Add 1/4 cup caster sugar, stirring until well combined. Make a well in the centre and add yeast mixture and eggs. Mix until well combined. Place mixture onto a floured surface and knead for 10 minutes (watch how to do this here). Place dough into a lightly oiled bowl and cover with glad wrap and stand in a warm place for 45 minutes, or until doubled in size.

3. Turn onto a lightly floured board and cut dough in two halves and knead each piece for 5 minutes. Roll each half out one into 5cm thick logs. Cut into 3-4cm slices then using your hands roll each piece into a round ball. Watch the video on how to do this here.

4. Half fill a saucepan with oil. Heat until oil to 170c (you will need a heat resistant thermometer) and ensure you maintain this heat throughout the process. Add 2 to 3 donuts at a time, cooking for 6 mins (3 minutes on each side). Remove with a slotted spoon and drain on paper towels. 

5. Once cooled, make your icing by mixing your icing sugar, water, butter and rose water together until smooth and combined. Dip the top of each donut in icing and then into the pistachio nuts. 

6. When ready to eat, place your Turkish delight in a microwave proof jug with your water and heat for 30 seconds. Mix with a spoon until melted and runny (add more water and heat again if necessary). Half fill a syringe (available at most chemists) with Turkish delight mix and insert into donut to fill. Repeat for remaining donuts and serve.


Visit our Instagram page for more 'how to' and action shots http://instagram.com/mekocreations

Saturday 10 August 2013

Happy Anniversary 'Honey'


Mr Meko and I celebrated 10 years together this week (since we met, not in marriage....yes we still remember our first date!), and last night thought it would be fitting to crack a special bottle of wine and have a gourmet homemade meal to celebrate the occasion. With the list of 'Sweet Treat Crazes of 2013' still front of mind for me and still continuing on the blog week by week (we only have two more to feature after this!) I thought it was time we tackled the flavour honey. Now I was surprised to see this flavour on the Sweet Treat Craze list as it's a pretty standard flavour in desserts, along with the likes of caramel which also featured on the list. Honey doesn't really strike me as a craze that we need to be on to, but rather know how to pair it up with other flavours that will make it shine. So rather than creating for you a honey cake or honey cookies, Mr Meko thought it was time to showcase a dessert (of which he is most well known for). So we present to you our Honey Panna Cottas with Caramel Popcorn and Caramel Sauce. We actually made some lovely 'picnic style' panna cottas last week when visiting a friend in hospital, which is probably why the idea was so front of mind. But I nearly fell off the couch when I tried these ones last night.......the mix of the honey and caramel against the delicate panna cotta with the crunch of the popcorn was just to die for. And if you watch your Master Chef as we do, you know that texture is the key to a good dessert. So please try this one, it's a really easy dessert to try at your next dinner party that will no doubt impress your guests.


Honey Panna Cottas with Caramel Popcorn and Caramel Sauce

(makes between 6-10 depending on mould size)

You'll need:

500mls milk
250mls cream
350gs honey
11g gelatine leaves
1/4 cup popping corn and vegetable oil for popping

Caramel Sauce:
275g brown sugar
215mls cream
100g butter

Soak your gelatine leaves in a bowl of cold water until soft.

Meanwhile in a saucepan, heat the milk, cream and honey over a high heat until just boiling. Remove off the heat.

Remove the gelatine leaves from the water, squeezing them to remove any excess water. Add the gelatine to the saucepan, stirring until dissolved. 

Transfer the cream mixture from the saucepan to a bowl and place in the freezer to cool for approx 30 mins, stirring every 10 mins to avoid freezing. If the mix starts to freeze, whisk back until it is runny. 

Lightly spray some dariole moulds (individual plastic moulds) with oil spray. 

Once cooled, remove your mix from the freezer and fill your moulds to just below the top of each one. Transfer your moulds to the fridge to set for at least an hour. NB. If your mix is too warm when you transfer to the moulds it will cause them to split. If this occurs, return to the saucepan and reheat before transferring back to the freezer to cool.

To make your caramel sauce, heat your cream and brown sugar together in a saucepan over a high heat until boiled. Remove from the heat and whisk in the butter until all combined. Set aside.

Make your popcorn as per the packet instructions. Then in a bowl pour some of your hot caramel sauce over your popcorn and stir until coated. Spread onto a tray lined with baking paper and set aside to set and cool. Once cool, break into pieces and set aside for later.

Once your panna cottas are set, prepare your plate. Using a dessert spoon, place a spoonful of the cooled caramel sauce on the plate and smear using the back of the spoon, dragging it through the sauce into an arc shape. NB Ensure your caramel sauce is not to hot to avoid melting your panna cotta when plated.

Loosen your panna cotta from its mould by creating air pockets around the side of the mould by gently pulling the panna cotta away from the edge of the mould and squeezing the mould gently to loosen it. Place the mould on the plate and gently remove to reveal the panna cotta. 

Decorate with your caramel popcorn and serve.

Sunday 4 August 2013

Boo! It's a name cake!


So we are almost through the list of sweet treat crazes of 2013, but I have been saving this particular sweet treat craze for a special little nephew of mine for his birthday. I am of course referring to the Peekaboo cake craze that is sweeping social media this year. Whether you've seen it done on the Great Australian Bake Off with their checker board cake challenge or seen the images a plenty on line of cakes sporting polka dots, rainbow swirls and even love hearts, we've all questioned "well how one earth do they do that?". So we thought we would show you! But given the abundance of tutorials on line on how to bake polka dots into your cakes we decided to take it to the next level and try something you hadn't seen before (we have actually only seen this done once before albeit unsuccessfully), a name cake. Yes that's right, cut the cake open to reveal the name of your loved one or maybe some special words. Now this will really only work for short names/words, unless you find some very small letter cutters, but you may lose the effect. And of course this can be done with any sort of image cutters, it doesn't have to be letters, so let your imagination run wild.


Step 1.

Bake your cakes for the letters inside the cake (get the recipe for our butter cake here). We baked 3 square butter cakes coloured with red food gel (one cake per letter to spell 'MAX').


Step 2.

Once your cakes are completely cooled, trim the tops of your cakes with a serrated knife to ensure a flat surface to work with.


Step 3.

Using letter cutters, cut your letters out and set aside. We got four of each letter out of each cake.


Step 4.

Prepare your cake batter for the rest of the cake. You can use the same butter cake recipe here.


Step 5.

Place a small amount of batter in the base of your tin and smooth over. Align your first row of letters set at least 2cm back from the front of the cake tin.Stack the remaining letters behind without any gaps.


Step 6.

Using a piping bag, pipe your cake batter in an around your letters, filling the tin. Use a spatula to smooth over the top of the cake.


Step 7.

Bake cake as per the recipe and allow to cool.


Step 8.

Once completely cooled, trim the cake sides and top using a serrated knife to ensure a perfectly sized cake with the lettering centered.


Step 9.

Decorate as desired. We covered our cake in butter cream with fondant cut letters to match the inside of the cake. Get our butter cream recipe here.


Popular Posts