 Matt and I are super excited that this week we will see an addition to our family by means of a little West Highland Terrier pup! At just eight weeks old, we can't wait to see what sort of mischief he will get up to, but alas we are prepared!...... Matt is currently installing a baby gate for our kitchen as we speak!
 But amidst preparations for the arrival of the new addition to our family this weekend, we also found time to road test the newest easy bake item on the market at the moment, the As Seen on TV Bake Pops tins and accessories. Having seen it on TV ourselves, we were keen to see if it was as 'easy' as they made out.....and truth be told, it was!
So given the the pending arrival of our little pup we thought it would be fitting to make some Puppy Pops! This is how we did it.
1. Mix together a cake batter using a box cake mix. Best to use a dense cake mix like mud cake for cake pops.
2. Spray both the bottom and top pan with baking spray. Flip the top pan over and spray the surface as some cake batter may bake up through the holes and stick to the pan.
3. Pour the batter into the bottom pan until all the cavities are filled.
4. Place the top pan on top of the bottom pan and secure with the clips.
5. Bake at 160 degrees for 25-35 minutes
6. Let the pans cool before removing the top pan
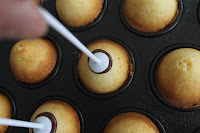
7. Once cooled for 10 minutes melt a small amount of chocolate melts in the microwave then dip the end of the pop stick into the chocolate and insert into the cake ball.
8. Place the pops into the freezer for 10 minutes to set
9. Removing your pops from the freezer, melt a larger batch of chocolate melts in the microwave and and dip each pop in the chocolate. 10. Decorate to your hearts content! We used fondant and chocolate to make our pups but you can be as simple or creative as you desire with sprinkles, lollies and piped chocolate.
So for less than $30 these Bake Pop tins are highly worth it and beats the manual labour involved in trying to create perfect circles the traditional way.
Happy popping x


